The process of making custom patches is a journey that turns an idea into a wearable badge that brands can proudly display, building recognition and loyalty. From concept to finished product, designers and producers align on purpose, audience, and placement to deliver cohesive patches that reflect brand values and storytelling, with discussions that map timelines, budgets, and responsibilities across teams. The patch design process balances art with practicality, selecting stitch types, borders, and colorways to ensure durability, legibility, and visual impact across lighting, fabric textures, and garment budgets. While some projects explore prints or woven options, embroidery patches remain a popular choice for texture, longevity, and a premium feel in both casual and formal wear worldwide. This holistic approach covers material selection, backing options, testing, and quality checks to ensure patches perform well, match artwork, and reinforce your brand identity across markets, while coordinating with suppliers and ensuring clear labeling.
Beyond the specific project, these items act as wearable emblems that tell a brand story on jackets, bags, and uniforms. Think of badge creation as a coordinated blend of art, fabric selection, backing, and finish, often described in terms of emblem production, textile patch design, and garment branding accessories. Teams and makers frequently explore embroidery and woven options, seeking consistency in color, texture, and durability across lots. Ultimately, the goal is to deliver reliable, market-ready identifiers that customers can trust and recognize at a glance.
Understanding the Patch Design Process: From Idea to Artwork
The patch design process begins with a clear concept and purpose. Defining the target audience, where the patch will be used, and how it should communicate a brand or idea sets the foundation for every decision that follows. Early sketches, mood boards, and guidance on colors and typography help narrow options before moving into vector artwork and stitch planning. This is the stage where ideas are mapped to feasible paths for production, ensuring the final product aligns with your goals and budget—whether you’re creating custom patches for a team, a collaboration, or a club.
As the concept solidifies, the focus shifts to translating that vision into a scalable patch design. The patch design process involves selecting appropriate embroidery or printing techniques, choosing backing options, and planning edge finishes that balance aesthetics with durability. Clear brand guidelines, including colors and typography, reduce revisions and accelerate the transition from concept to production for embroidery patches and other patch types within the broader custom patches workflow.
Material Selection and Patch Type for Durability and Appeal
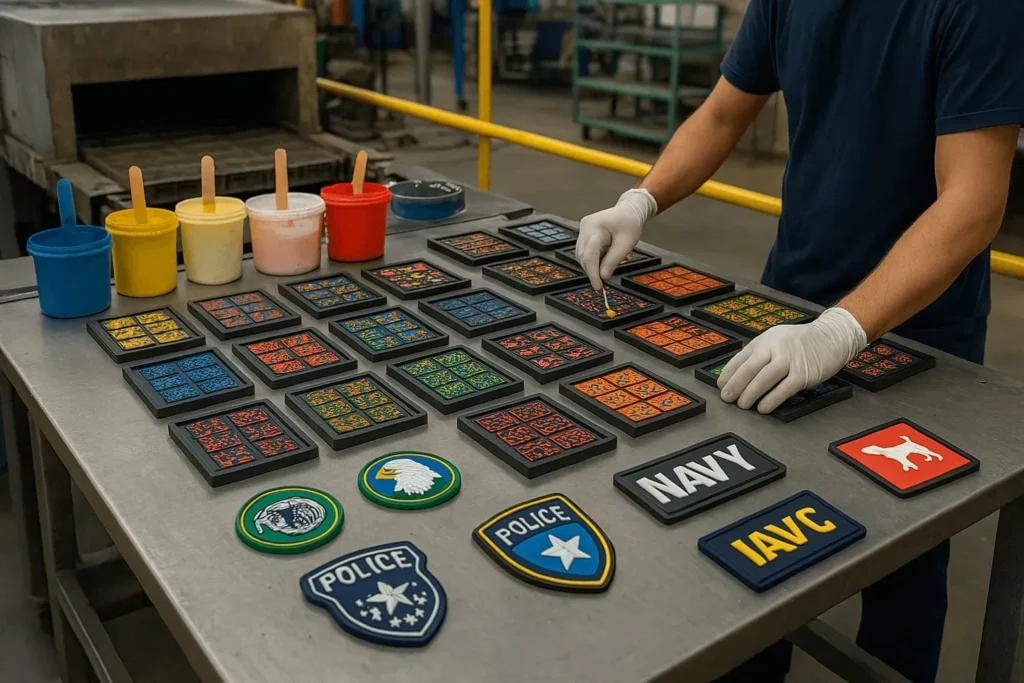
Material choice shapes not only the look and feel of embroidered patches but also their wearability and washability. Common bases like twill and felt influence texture, weight, and how well a patch holds its shape over time. Backing options—iron-on, sew-on, or adhesive—affect usability and lifecycle, while UV-resistant threads and weatherproof fabrics can extend performance in outdoor or active contexts. This phase is central to patch manufacturing, as the materials determine cost, lead time, and care instructions for the finished product.
The patch type selected—embroidery, woven, or printed—drives both aesthetics and production considerations. Embroidered patches tend to offer classic texture and durability, while printed or woven options can create different visual effects and edge profiles. In the realm of custom embroidered patches, the material and patch type work together to deliver the desired balance of softness, stiffness, and resilience, ensuring the final patches look premium and wear well under real-world conditions.
Prototyping and Testing: The Process of Making Custom Patches
Prototyping is where ideas become tangible. A physical sample lets you validate stitch counts, edge finish, color accuracy, and backing adhesion before committing to a full run. This phase is essential for catching issues early, whether you’re aiming for a simple iron-on patch or a complex multi-color embroidery patch. By reviewing a concrete specimen, stakeholders can assess feasibility, confirm branding accuracy, and confirm that the envisioned look translates correctly from screen to fabric.
Testing expands beyond appearance to real-world performance. Prototypes undergo wash cycles, sunlight exposure, abrasion tests, and, if needed, chemical resistance checks to simulate long-term wear. The Process of Making Custom Patches comes alive here as iterations refine density, thread choice, and backing compatibility. A few well-made samples can save substantial rework costs later and ensure manufacturers understand the exact expectations for your custom patches project.
Production Methods and Patch Manufacturing: Techniques for Different Effects
With a finalized prototype, production begins using methods suited to your goals. Multi-head embroidery machines handle bulk runs with consistent stitch counts and color density, while alternatives like sublimation or weaving produce distinct textures and effects that set your patches apart. This phase is where patch manufacturing scales the approved artwork into precise, repeatable results, maintaining alignment with color specifications and production timelines.
Attention to detail during production matters just as much as the design. Stitch density, border style (such as satin or merrow edges), and color management across dye lots influence the final look. Clear communication about packaging, labeling, and care instructions ensures that the finished patches not only look right but also arrive ready for sale or distribution. In the context of patch manufacturing, these decisions directly shape cost, lead times, and the consistency customers expect from your brand.
Finishing, Packaging, and Branding for Unforgettable Patches
Finishing touches define the professional impression of your patches. Edge finishes, backing choices, and any extra features—like Velcro for removable patches—impact both aesthetics and usability. Packaging design and labeling choices—heat-seal sheets, polybags, or hang tags—support brand storytelling and inform end-users about care and origins. For brands seeking premium presence, these decisions align with the broader strategy of delivering a cohesive line of custom patches that speak to your audience.
Brand consistency extends beyond the patch itself to packaging and presentation. Clear care instructions, country of origin disclosures, and branding marks help build trust with customers and retailers. When done well, packaging becomes a marketing tool that reinforces your patch’s identity and ensures that every unit arriving on shelves reinforces your story as part of the custom patches program.
Quality Assurance, Logistics, and Aftercare for Longevity of Patches
Quality assurance ensures every patch meets the defined standards before it reaches customers. This includes color fidelity, edge finishing, backing adhesion, and thickness uniformity, often aided by a sampling plan to test a percentage of patches from each batch. Comprehensive documentation—bill of materials, color codes, and stitch counts—supports traceability and vendor accountability in the patch manufacturing pipeline.
Finally, logistics and aftercare complete the lifecycle of a patch project. Lead times vary with order size and complexity, while careful planning mitigates dye lot variations and material shortages. Providing clear aftercare guidance—such as washing instructions and proper applications—helps end users maximize the life of their patches, ensuring that the investment in custom patches pays off through continued wear and visibility.
Frequently Asked Questions
In the process of making custom patches, what is the first step and why is ideation critical?
The first step is ideation. It involves clarifying the patch purpose, target audience, and usage, and deciding whether the patch will be embroidered, woven, or printed, as well as choosing the backing option such as iron on or sew on.
In the patch design process, how are vector artwork and digitizing used to prepare embroidered patches?
In the patch design process, provide a high quality vector artwork file and create stitch ready files. Designers outline colors and stitch types, choose border styles like satin or merrow, and use digitizing to balance coverage with thread count while ensuring color matching across lots.
What materials and patch types should I choose for embroidery patches within the patch manufacturing workflow?
In the patch manufacturing workflow, select materials and patch type for embroidery patches. Common bases include twill and felt; backing options include iron on and sew on; consider UV resistant threads for outdoor use and finishing options such as heat seal backing or hook and loop closures.
Why is prototyping important in the process of making custom patches?
Prototyping is important because it lets you test stitch counts, edge finish, color accuracy, and backing adhesion. It also enables iterations on patch shape, color palette, and backing method before mass production, reducing costly rework.
During production and patch manufacturing, what factors affect consistency and lead times?
During production and patch manufacturing, plan for order quantity, dye lot consistency, thread choice, and stitch density. Production methods can include multi head embroidery, sublimation, or woven technologies, with attention to packaging and labeling to maintain consistency.
What does quality assurance look like in the patch manufacturing process, and how should I handle aftercare and packaging?
Quality assurance involves color fidelity, stitching integrity, edge finishing, and backing adhesion. A sampling plan and documentation such as a bill of materials help with traceability, while packaging checks and care instructions ensure end users know how to care for their patches.
| Phase | Focus | Key Points | Deliverables / Notes |
|---|---|---|---|
| Phase 1 — Concept and Ideation | Translate idea into a tangible vision; define purpose, target audience, and where the patch will be used; determine size, shape, colors, typography; decide embroidery/ weaving/ printing or a combination; choose backing (iron-on, sew-on, or adhesive) and consider usability, cost, and wear. | Purpose and audience defined; initial design direction established; backing option chosen. | Early sketches or mood boards; concept brief; initial backing decision. |
| Phase 2 — Design and Artwork | Create a high-quality vector artwork; prepare stitch-ready files; outline each color, stitch type, and density; decide border style (satin or merrow); color matching; provide clear brand guidelines. | Crisp, scalable embroidery design; consistent color and stitch language; clear brand usage. | Vector file; stitch map; color specs; border choice; brand guidelines. |
| Phase 3 — Material and Patch Type Selection | Choose base materials (e.g., twill, felt, twill-backed fabrics); decide backing (iron-on vs sew-on); consider UV-resistant threads and weatherproof materials; select finishing options (heat-seal, Velcro, or mix); assess cost, lead time, and care compatibility. | Material feel, durability, and care plan defined; backing and finishing aligned with use case. | Material and backing selected; finishing options documented; care instructions planned. |
| Phase 4 — Prototyping and Testing | Create prototype patches to validate design intent and workmanship; test stitch counts, edge finish, color accuracy, and backing adhesion; iterate on shape, palette, and backing; conduct real-world wear tests (wash, sunlight, abrasion); plan for potential rigorous tests if longevity is a goal. | Prototype validated; issues identified early to avoid mass-production costs. | Prototype samples; testing results; agreed revisions. |
| Phase 5 — Production and Manufacturing | Proceed to production with finalized prototype; define order quantity, dye lot consistency, thread choice, and stitch density; select production methods (multi-head embroidery, sublimation, or woven); finalize packaging and labeling; communicate branding marks, care instructions, or origin disclosures. | Consistent quality across batches; clear instructions for manufacturers. | Production plan; packaging and labeling specs; timeline. |
| Phase 6 — Quality Assurance and Packaging | Implement QA checks for color fidelity, stitching integrity, edge finishing, and backing adhesion; use sampling plans; maintain documentation (bill of materials, color codes, stitch counts); verify packaging quality and retail presentation standards. | Reliable, traceable product quality; consistent packaging. | QA reports; BOM; color codes; packaging verification. |
| Phase 7 — Logistics, Delivery, and Aftercare | Plan for lead times based on order size and complexity; manage potential delays (color dye lots, material shortages); ensure efficient distribution to warehouses or retailers; provide care instructions and washing guidelines; collect post-launch feedback for future patches. | Delivery is timely; end-user support and feedback loop. | Logistics plan; aftercare guidelines; feedback process. |
| Expert Tips for a Smooth Patch Project | – Start with clear artwork: a clean vector file reduces revisions and speeds up production. – Be realistic about color and stitch counts: more colors or higher stitch density increases cost and lead time. – Test backing options: iron-on backs are convenient, but sew-on backs can offer longer life in demanding use cases. – Plan for packaging early: consistent packaging improves shelf appeal and helps with inventory management. – Communicate with manufacturers: provide a detailed spec sheet and a single point of contact to avoid miscommunications. |
Practical steps to minimize revisions and delays. | List of practical tips to guide production. |