Remove patches without damaging fabric is a valuable skill for any DIY enthusiast, turning repairs into opportunities for fresh style without compromising the garment. By focusing on patch removal techniques, you can preserve fabric integrity while deciding whether to reuse fabric patches on a new piece. This guide outlines safe tools and practical steps that help you perform the task with confidence and minimal waste. Careful handling and the right tools prevent fraying, puckering, and color bleed, keeping the fabric looking fresh after patch work. With patience and practice, you’ll extend the life of garments and explore options to reuse patches on future projects.
Other terms for this craft emphasize its broader role in garment care. Think of removing appliques, detaching emblems, or editing decorative panels without harming the fibers. The aim remains the same: protect fabric integrity while enabling reuse, repurposing, or smoother restoration of the base textile. Using LSI-informed phrasing also ties this topic to fabric science, sustainable fashion practices, and practical repair skills you can apply across wardrobes.
Remove patches without damaging fabric: Safe, Step-by-Step Guide
Removing patches without damaging fabric is a goal that many DIYers pursue. This guide emphasizes safe, patient methods, proper tools, and step-by-step actions to preserve the base garment while salvaging or reusing patches.
By following patch removal techniques, you minimize the risk of fraying, puckering, or color bleed, setting you up for reuse fabric patches or patch repair tips later. The approach focuses on understanding fabric type, patch material, and the right sequence for sew-on versus iron-on patches to protect the garment.
Understanding patch materials and fabric types for effective patch removal
Patch materials vary from sew-on embroidery to heat-activated iron-on adhesives, and fabrics range from denim to silk. Identifying the patch type and fabric helps tailor the removal method and reduces risk to the garment.
Understanding patch removal techniques for different combinations—such as denim with sew-on patches versus delicate knits with iron-on patches—lets you plan steps, anticipate edge fraying, and choose safe residues cleaners. This knowledge supports reuse fabric patches and provides useful patch repair tips.
Tools, safety, and prep for patch removal success
Build a small toolkit and prepare a clean workspace. The right tools—seam rippers, fine scissors, pliers, a lint roller, and fabric-safe adhesive remover—make removal smoother and safer.
Safety measures such as gloves, good lighting, and ventilation minimize risk when handling heat or solvents. Pre-work steps like turning the garment inside out, testing a solvent on a hidden area, and laying the fabric flat further reduce the chance of accidental damage.
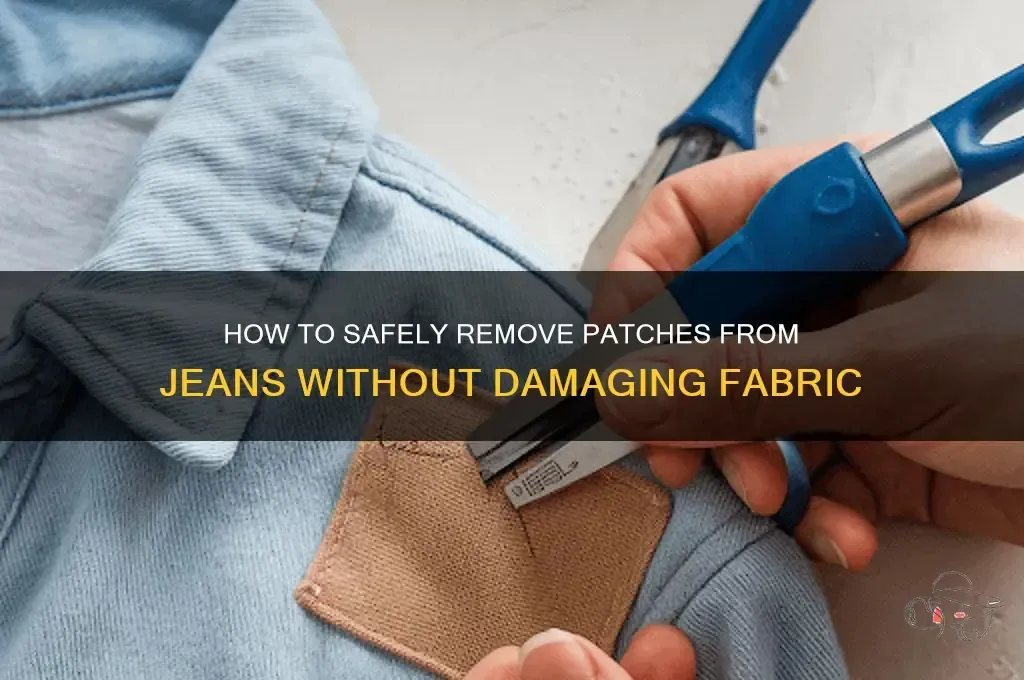
Sew-On vs Iron-On: Step-by-Step methods to remove patches without harming fabric
Sew-on patches: Turn the garment inside out and gently cut stitches along the patch edge with a seam ripper or small scissors. Work slowly to avoid pulling on the base fabric and use tweezers to remove loose thread fragments.
If threads resist, a tiny dab of fabric-safe adhesive remover can help, testing first on a hidden area. For iron-on patches, preheat the iron to a low-to-medium setting with a pressing cloth, and lift the edge with a thin tool to separate adhesive from the fabric, avoiding scorching.
How to remove patches safely: residues, heat, and cleanup tips
Adhesive residues can linger after removal. Use non-damaging methods to clean them, such as fabric-safe removers or rubbing alcohol on a cotton swab, and always test first on an inconspicuous spot.
Post-removal care is essential: inspect the fabric, remove any residue, and plan for fabric care after patch removal. Gentle washing, air drying, and using a pressing cloth help prevent color bleed and texture changes while keeping the garment looking fresh.
Reuse, care, and repair: patch reuse and fabric care after patch removal
Reusing patches involves prepping both the patch and the new surface. Clean the patches, press flat, and position with pins before sewing or heat-pressing with fusible Web if appropriate.
Care after reattachment matters: for both sew-on and iron-on patches, use gentle washing cycles and low heat drying, and apply extra stitching around the edges as needed. This approach aligns with guidelines for fabric care after patch removal and helps extend the life of the garment and the patch.
Frequently Asked Questions
How to remove patches without damaging fabric: what are the best patch removal techniques for sew-on and iron-on patches?
To remove patches without damaging fabric, first identify whether the patch is sew-on or iron-on and choose the appropriate patch removal techniques. For sew-on patches, use a seam ripper along the inner edge and work slowly to avoid snagging the base fabric. For iron-on patches, gently lift an edge and release the adhesive, using a little fabric-safe remover or rubbing alcohol and testing on a hidden area first. Finish by cleaning any residue and inspecting the fabric for fraying to guide fabric care after patch removal.
How can you reuse fabric patches after removing them without damaging the garment?
After removing patches, inspect both patch and garment for wear and clean the patches so they can lay flat when reused. Prepare the new fabric surface and decide whether to sew or apply a new adhesive backing. Use pins to hold the patch in place, then follow patch repair tips for secure attachment—sewing for durability or heat-activated backing for quick reuse. Test the bond before regular wear.
How to remove patches safely on delicate fabrics to protect the base fabric?
Use low heat and gentle tools when removing patches from delicate fabrics. Avoid pulling or stretching; work slowly and with a protective cloth between the iron and fabric if you must apply heat. For adhesives, test a fabric-safe remover on a hidden area and stop if color or texture changes. This approach follows how to remove patches safely.
What is essential for fabric care after patch removal to prevent fraying and color bleed?
After patch removal, wash the garment inside out on a gentle cold cycle and air-dry to minimize stress on the fabric. Finish edges with a tiny zigzag stitch or fusible stabilizer to prevent fraying, and wash patches separately the first few times to prevent color bleed. This fabric care after patch removal helps maintain the garment’s look.
What patch repair tips help when reattaching patches or applying new ones?
Plan patch placement carefully and stabilize the area before reattachment. Choose the right method—sew-on for durability or heat-activated backing for quick reuse—and follow patch repair tips like secure edge stitches. For knit fabrics, sew edges with a small satin stitch to prevent curling; test fit before final attachment.
What tools and safety measures should you follow to remove patches without damaging fabric?
You’ll need fine-tipped scissors or a seam ripper, small pliers, a lint roller, fabric-safe adhesive remover or rubbing alcohol, and an iron with a pressing cloth. Work on a clean, well-lit surface and wear heat-resistant gloves if handling hot patches. Test any solvents on hidden areas, and work slowly with patch removal techniques to minimize risk to the fabric.
| Aspect | Key Points |
|---|---|
| Goal of patch removal | Preserve the base garment while enabling reuse or clean removal; emphasizes safety, care, and reusability. |
| Patch types & fabrics | Patches can be sew-on or iron-on; fabrics include denim, cotton, wool, knit, and synthetics; each type/fabric needs a tailored approach. |
| Tools & safety | Fine-tipped scissors/seam ripper, small pliers, lint roller, fabric-safe adhesive remover or rubbing alcohol, iron with pressing cloth, pins, optional needle & thread; work on a clean, well-lit surface; manage heat safely. |
| Sew-on patch removal steps | Turn garment inside out; cut stitches along inner edge; remove threads; pull out frayed bits; test area for residues; reinforce frayed edges if needed. |
| Iron-on patch removal steps | Use low–medium heat with a pressing cloth; lift patch edge and separate adhesive; remove adhesive residue carefully; wipe area; consider heat-free methods (parchment + warm air) for stubborn patches. |
| Edge cases & mixed patches | Handle beads/embroidery with care; remove patches from layered designs gradually; test solvents/heat on inconspicuous spots. |
| Reusing patches | Clean patches; prepare new surface; choose reattachment method (sewing or fusible webbing); position with pins; secure edges with appropriate stitches; test bond. |
| Post-removal care | Gentle washing and cold cycles; air-dry; use a pressing cloth; protect patch edges; prevent fraying with edge finish; wash patches separately initially to avoid color transfer. |
| Troubleshooting | Puckering, adhesive residue, curling edges, or color/color texture mismatch; address with gentle interior pressing, selective stitching, or backing fabrics as needed. |
| Real-world scenarios | Denim jackets (sewn patches), jeans/workwear (dense stitching), knitwear (gentler handling), kids’ clothing (check for residue and test first). |
| Eco & budget impact | Reduces waste and saves money by reusing patches and extending garment life; supports sustainable fashion. |
Summary
In summary, removing patches without damaging fabric involves understanding patch types and fabrics, gathering the right tools, following careful sew-on or iron-on removal methods, and considering reuse and post-removal care. By practicing these steps, you can protect the base garment, extend its life, and keep patches usable for future repairs or upcycling.