Custom embroidery on clothing lets you transform plain garments into personalized works of art, turning a simple tee, jacket, or dress into something that speaks your style and tells a little story through thread. If you’re new to stitching, a clear path starts with understanding how to embroider on fabric, selecting the right fabric, stabilizers, and threads, and imagining where a small motif or a bold panel will best complement the garment. This practical, SEO-friendly guide doubles as a DIY embroidery tutorial that walks you through planning, transferring your design, stabilizing the fabric, choosing stitches, and finishing techniques so you can produce high-quality embroidered designs on clothing. By outlining a simple workflow, concept, transfer method, hooping, stitch selection, and final finishing, you’ll see how consistent tension, thoughtful color choices, and tested techniques translate into durable results that feel professional. Whether you intend to embellish a single item or produce a small collection, the basics can adapt to both hand and machine approaches, letting you decide how you want your wearable art to be created.
In other terms, this craft is decorative stitching on garments that elevates fabric into wearable art. You might hear it described as embroidered motifs on apparel, needlework embellishment, or textile decoration that enhances jackets, tees, and accessories. Approaching it as embellishment rather than a fixed technique helps you explore color, texture, and pattern in a way that resonates with current fashion trends. LSI-friendly content connects concepts like fabric stabilization, threading, and stitch types with practical outcomes, making the topic more discoverable to readers and search engines. Whether your aim is personal style, customization for gifting, or small-batch production, this broader vocabulary supports a deeper understanding.
Planning Your Custom Embroidery on Clothing: From Ideas to Placement
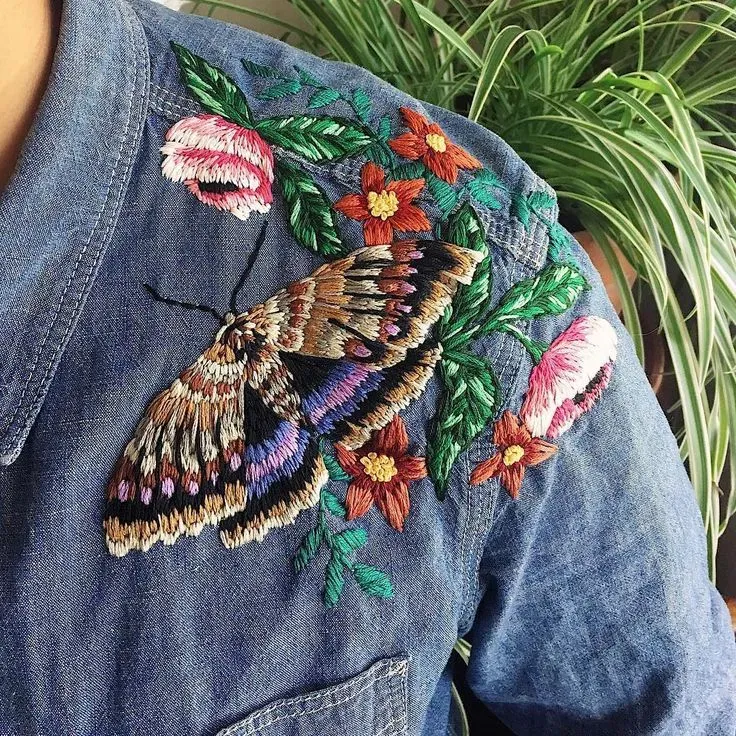
Begin with embroidered design ideas that suit the garment’s style and color. Consider motifs from nature, geometry, typography, or abstract shapes to create a cohesive look that expresses your personal taste. If you’re collecting embroidered design ideas, note which motifs translate well to fabric and how many colors you’ll need.
Plan where the embroidery will live on the garment and how large it should be. For tees, a small chest or sleeve motif works well; for jackets, a larger central panel can act as a focal point. Removable chalk marks help visualize placement before stitching, and approaching the project with a DIY embroidery tutorial mindset keeps you organized.
Materials That Make Custom Embroidery on Clothing Easy
Choosing the right materials sets the foundation for a successful project. Gather a stable work surface, an appropriate embroidery hoop, and a suitable stabilizer based on fabric weight. Quality embroidery thread and sharp needles are essential, and you’ll want to understand how to embroider on fabric to select compatible tools and techniques.
Whether you’re hand-stitching or using a sewing machine, stabilizers prevent puckering and ensure neat stitches. For woven fabrics, cutaway stabilizers are common; for knits, tear-away stabilizers with light tension work best. You’ll also consider machine embroidery on clothes if you want faster results or repeatable designs.
Transferring Your Design: Precise Placement for Clothing Embroidery
Transferring the design accurately is crucial for professional results. Use tracing, water-soluble ink, heat transfer, or stabilizer-backed templates to move the pattern from paper to fabric. The goal is clean lines that stay put as you stitch, which is a key part of any DIY embroidery workflow and a solid example of how to embroider on fabric.
Choose a method that fits your fabric and design—lightly sketch first on scrap fabric, then transfer to the garment. Check alignment by folding the garment and rechecking the center and edges. This step is part of a step-by-step embroidery on clothes process to ensure precision.
Stitches and Techniques to Bring Garments to Life
Stitch selection shapes the final look. Use satin stitches for bold filled shapes, backstitches for crisp outlines, running stitches for delicate lines, and long-and-short stitches for subtle shading. French knots add focal dots—great for flower centers or micro accents.
Practice stitch density and tension on scrap fabric before committing to the garment. A combination of stitch types creates texture and depth while keeping the garment comfortable to wear. Whether you choose hand embroidery or machine embroidery on clothes, consistent technique yields professional results.
A Simple Beginner Project: Floral Motif on Clothing
A practical beginner project is a small floral motif. Prepare the garment, stabilize the area, and transfer a simple 2–3 inch flower outline to start. Following a guided approach mirrors the structure of step-by-step embroidery on clothes projects, helping you gain confidence.
Outline with backstitch, then fill petals with satin stitch and leaves with a longer/shorter mix. Add center details with French knots for texture. Finish with a light press and check tension; the result is a wearable piece that demonstrates the core workflow of a DIY embroidery tutorial.
Care, Finishing, and Troubleshooting for Embroidered Garments
Care and finishing touches help your embroidery last. Press from the back with a low heat setting and follow garment care labels to avoid color bleed or distortion. This guidance works for both hand and machine approaches to embroidery on clothes.
Common issues like puckering, thread fraying, or uneven stitch length have practical fixes. Adjust stabilizer choice, hoop tension, and machine settings; rethread the needle and replace worn components. With proper care and troubleshooting, you can continue expanding your embroidered clothing collection.
Frequently Asked Questions
What is custom embroidery on clothing and where should I begin?
Custom embroidery on clothing lets you personalize garments with stitched designs. To begin, plan your motif, select a suitable fabric, and gather stabilizers, an embroidery hoop, and quality threads. Then transfer the design, stabilize the fabric, choose stitches, sew, and finish by securing threads and pressing lightly for a polished result.
What are embroidered design ideas for customizing clothing?
Embroidered design ideas for clothing include initials, floral motifs, geometric shapes, or nature-inspired imagery. Size the motif to fit the garment surface and keep the color palette to two to four colors for a clean, cohesive look. These ideas support stylish, wearable custom embroidery on clothing.
How do you choose fabrics and stabilizers when learning how to embroider on fabric?
Choosing fabrics and stabilizers is crucial for custom embroidery on clothing. Woven fabrics like cotton or denim typically need cutaway stabilizers, while knits benefit from lighter stabilizers to avoid bulk. Pair the right hoop size with the fabric, ensuring the material is taut before stitching.
Can you recommend a DIY embroidery tutorial for beginners working on clothes?
Yes. A DIY embroidery tutorial for clothes should cover planning, transferring, stabilizing, stitching, and finishing. Start with a simple motif on stable fabric, gather the materials, and follow a step-by-step approach to build confidence in custom embroidery on clothing.
What are the differences between machine embroidery on clothes and hand embroidery?
Machine embroidery on clothes speeds production and delivers consistent results, ideal for larger projects or multiple garments. Hand embroidery offers greater creative control and a tactile finish for small, detailed motifs. Both methods can yield high-quality custom embroidery on clothing depending on your project goals.
What steps are involved in a step-by-step embroidery on clothes project?
A step-by-step embroidery on clothes project generally includes planning the design, transferring it to fabric, stabilizing, hooping, stitching with appropriate techniques (such as backstitch, satin, and long-and-short), and finishing with secure knots and careful trimming. Finish by a gentle press from the back and following garment care guidelines to preserve the embroidery.
| Section | Key Points |
|---|---|
| Introduction | – Purpose: Transform plain garments into personalized art through planning, transferring, stabilizing, stitching, and finishing. – Applies to a range of fabrics and project scopes. – A step-by-step workflow helps you confidently produce high-quality embroidery on clothing. |
| Materials and Tools | – Stable work surface, clean hoop setup, and good thread quality. – Fabric or garment options: cotton, denim, knits (beginner-friendly) vs delicate fabrics (special care). – Embroidery hoop (size matters for tension). – Stabilizer (cutaway for woven, tear-away for knits; consider water-soluble for delicate fabrics). – Embroidery floss/thread; avoid kink-prone threads; pre-wound bobbins can help. – Needles/tools, scissors, marker/transfer pen, good lighting. – Transfer method: water-soluble pens, tracing paper, heat-erasable markers. – Optional: stabilizer sheets, spray adhesive, hooped design mat. |
| Design ideas and planning | – Start with a clear concept that matches the garment style and color palette. – Draw inspiration from nature, geometry, typography, or abstracts; size to complement the surface. – Planning tips: – Size/placement: small motif on tee chest/sleeve; larger central motif on jackets; mark with removable chalk to visualize. – Color: limit to 2–4 colors; high contrast can help readability. – Stitch variety: mix fill stitches (satin, long-and-short) with outlines for texture. |
| Transferring the design to fabric | – Accurate transfer helps alignment during stitching. – Methods: – Tracing with a light source and transfer pen. – Water-soluble ink for direct guide lines. – Heat transfer paper with iron/heat press for exact placement. – Stabilizer-backed templates for larger designs on sturdy fabrics. |
| Choosing stabilizers and hoops | – Stabilizers support stitches and prevent puckering; choice depends on fabric. – Woven fabrics: cutaway stabilizers for dense stitches. – Knits: tear-away stabilizers with light application. – Delicate fabrics: water-soluble or ultra-thin stabilizers to minimize stiffness. – Hoop: choose a hoop that keeps fabric taut without excess stretch; can re-hoop smaller sections for bulky garments. |
| Stitch techniques and tips | – Common stitches: – Running stitch: light outline work. – Backstitch: strong outlines and lettering. – Satin stitch: dense fills for smooth shapes. – Long and short: shade and texture. – French knot: centers and small accents. |
| A practical step-by-step project: small floral motif | Step 1: Prepare garment and stabilize area; hoop fabric taut. Step 2: Transfer design, start with a simple 2–3 inch motif. Step 3: Outline with backstitch or split fly stitch. Step 4: Add leaves/petals with satin stitches; use long-and-short for shading. Step 5: Fill center with French knots or small satin fill. Step 6: Finish edges and check tension; trim loose threads. |
| Machine vs hand embroidery | – Machine embroidery speeds production and yields consistency for large runs or multiple garments; requires an embroidery-capable machine or service. – Hand embroidery offers greater creative control and tactile finish for small, personal designs. |
| Care and finishing touches | – Press from the back with low heat; avoid direct heat on embroidery. – Follow care guidelines on the garment label to prevent shrinking or thread creep. |
| Troubleshooting common issues | – Puckering: adjust stabilizer, tension, and hooping; use firmer stabilizer for dense fills. – Fraying/snags: verify thread quality and needle size; use new needles. – Uneven stitches: re-thread and check presser foot pressure and machine settings. |
| Expanding your skills beyond the basics | – Move to more complex designs, layered fills, and color blends. – Try different fabrics (canvas, denim, lightweight knits) and varied garment items (jackets, tees, bags). – Treat embroidery as a creative habit that keeps wardrobe fresh. |
| Conclusion | – (See below for a descriptive summary of the topic.) |
Summary
This description shows how custom embroidery on clothing can transform ordinary garments into wearable art through planning, transferring, stabilizing, stitching, and finishing.