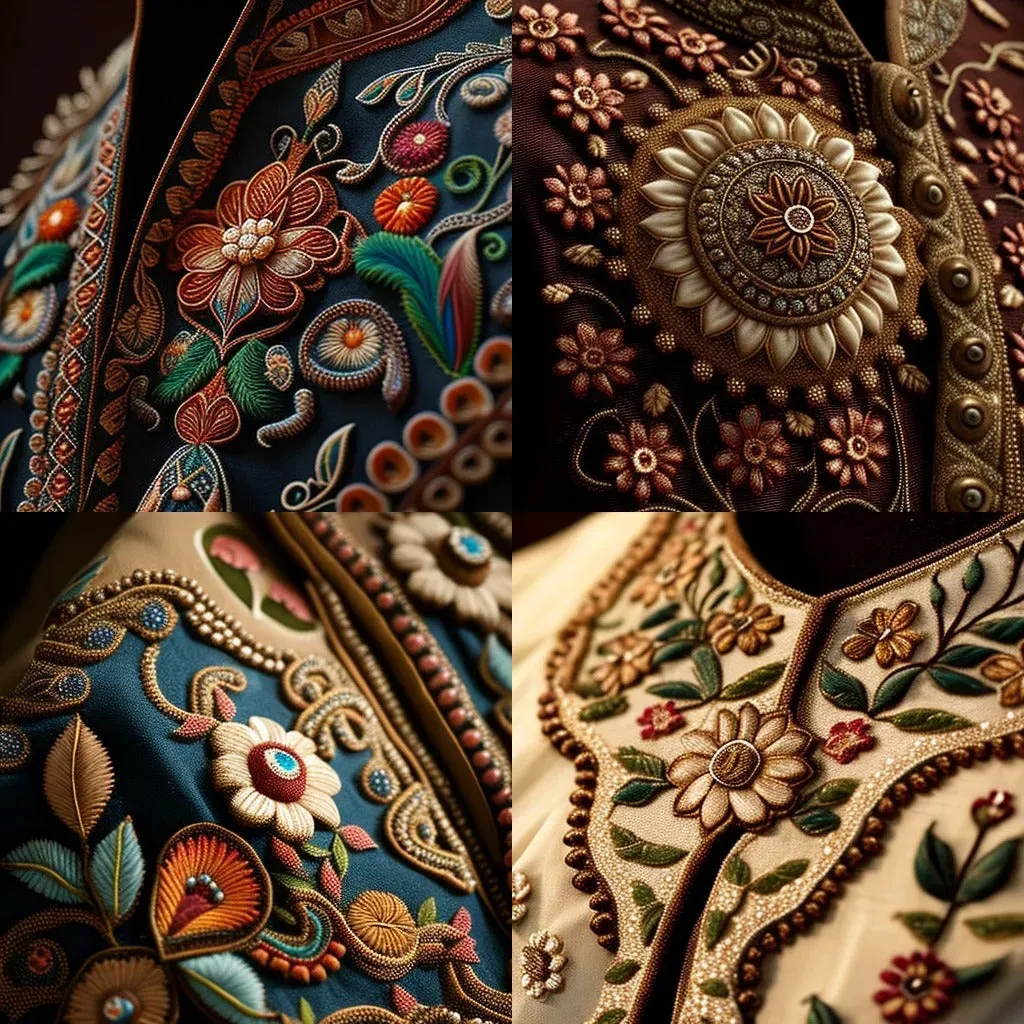
Polished embroidered design on garments signals craftsmanship that elevates everyday clothing into wearable art, a standard that seasoned makers chase by balancing texture, weight, weave, stretch, and durability while planning for long-term care and frequent wear. To achieve this level of finish, professionals rely on careful stabilizer choices, precise hooping, tension tuning, and proven embroidery techniques for garments that prevent warping, puckering, and color bleed under repeated washing. Whether you’re using machine embroidery for clothing or exploring hand embroidery finishing techniques, the stabilizer selection, thread weight, needle type, and stitch density all shape the final appearance, from crisp edges to smooth fills. A thoughtful design prep—digitizing, color planning, fabric testing, and scalable sizing—lets you map a motif that reads clearly on the chosen fabric and eases the process of designing embroidered patches for apparel when patches are part of the plan. With patience, repeated swatch testing, and careful finishing touches such as secure thread tails and neat edge work, you can lock in a polished result that stays crisp through wear, washing, and seasonal styling.
Beyond the direct description, this second paragraph introduces the topic using alternative terms that align with search intent and Latent Semantic Indexing (LSI). Think of quality garment stitching, refined thread work on apparel, and decorative fabric art as synonyms for the same craft. The focus remains on how materials, backing, tension, and planning contribute to a durable, attractive finish that looks intentional. By using related terms and varied phrasing, you guide readers and search engines to understand the scope of garment embroidery beyond a single label.
Polished embroidered design on garments: From Concept to Wearable Art
A polished embroidered design on garments begins with a clear concept and an understanding of the fabric’s texture, weight, and construction. Visualize how the motif will sit on caps, tees, jackets, or denim, and plan stabilizers and hooping accordingly. This is the moment where embroidery techniques for garments meet design intent, ensuring the result reads well at size and stays durable through wear.
The process blends strategy with artistry: selecting thread weights, needles, and backing that vanish visually, while maintaining color integrity. Whether you prefer machine embroidery for clothing or hand embellishment for a personal touch, thoughtful prep—color planning, pull compensation, and underlay—creates a professional imprint that remains vibrant after washing.
Stabilizers that Promise a Clean, Durable Embroidery on Garments
Stabilizers are the unseen backbone of a pristine finish. For woven fabrics like cotton twill or denim, cutaway stabilizers prevent distortion and support dense stitches. For knits, a tear-away combined with stabilizing underlays keeps edges flat and prevents tunneling. The right stabilizer helps the design sit flush with the fabric, a hallmark of high-quality embroidery techniques for garments.
Choosing stabilizers is a professional embroidery tip in itself: test options on swatches, match firmness to stitch density, and ensure the stabilizer disappears under the stitch area. With proper backing, even complex fills or satin outlines maintain crisp edges after wear and multiple washes.
Digitizing and Color Planning for Garment Embroidery Mastery
Before a stitch is ever laid, digitizing translates artwork into machine-readable instructions. Understanding stitch types, density, underlay, and pull compensation helps the design read clearly on the chosen garment. In tandem, color planning aligns thread choices with fabric and lighting, ensuring the final piece looks intentional across sizes.
Colorway strategy is essential for professional results. Map threads to fabric tones and, when patches are involved, plan patch colors to preserve brand or aesthetic integrity. Testing color swatches on similar fabric helps prevent surprises once the design is stitched on the final garment, a practical tip from ‘designing embroidered patches for apparel’ workflows.
Machine vs. Hand: Techniques for a Flawless Garment Finish
Machine embroidery for clothing offers speed and consistency, provided the machine is well-tuned with a sharp needle and quality threads. A polished look also comes from careful edge finishing and stable hooping, combined with appropriate thread choices—polyester for durability, rayon for sheen, or cotton for a matte finish.
Yet hand embroidery finishing techniques remain valuable for refined touches—secure thread tails, precise underlay layer adjustments, and clean trimming—especially on edges and logos. The synergy of machine precision and hand-finishing artistry yields a garment that feels crafted rather than mass-produced.
Stitch Patterns, Underlays, and Edge Finishes for Crisp Garments
Different fabrics demand different stitch strategies. Satin stitches create a glossy outline on soft fabrics, while fill stitches cover larger motifs. An effective underlay stabilizes the surface and minimizes waviness, setting up clean, crisp edges that resist fraying.
Density is a critical consideration: test on scrap fabric to calibrate stitch length, density, and thread weight. On darker textiles, avoid bold color punch-through by selecting appropriate thread shade and testing against backing. A well-planned edge finish—whether a satin edge or a stitched outline—defines the motif and elevates the professional look.
Troubleshooting, Care, and Quality Checks for Long-Lasting Garment Embroidery
Even the best prep can encounter puckering, thread breaks, or color bleed. Reduce fabric tension, adjust stabilizer choice, and fine-tune stitch density to mitigate puckering. Use high-quality threads and ensure needle compatibility with fabric weight to minimize thread breakage.
Quality checks extend beyond stitching: evaluate colorfastness, backing visibility, and how the design sits on the garment after washing. A final test wash and careful trim of tails help confirm the piece will endure wear, making it a reliable example of ‘professional embroidery tips’ in action.
Frequently Asked Questions
What defines a Polished embroidered design on garments, and how do embroidery techniques for garments influence fabric compatibility and stability?
A Polished embroidered design on garments is defined by proper fabric compatibility, balanced stitch density, appropriate thread choice, and stable backing. This is achieved through targeted embroidery techniques for garments, using the right stabilizer, precise hooping, and careful trimming to prevent distortion and waviness while ensuring durability.
What are the essential professional embroidery tips for achieving a Polished embroidered design on garments when using machine embroidery for clothing?
Professional embroidery tips for machine embroidery for clothing include selecting a sharp needle, high-quality threads, correct tensions, and suitable stabilizers, plus thoughtful color planning. For a Polished embroidered design on garments, ensure effective underlay, test stitch density on similar fabrics, and monitor stitch quality to minimize puckering and color misalignment.
How does design prep, including digitizing and color planning, contribute to a Polished embroidered design on garments?
Design prep directly shapes a Polished embroidered design on garments. Digitizing requires understanding stitch types, density, underlay, and pull compensation to read clearly on the chosen fabric, while color planning maps thread colors to the garment and any patches, ensuring legibility and balance across sizes.
Which hand embroidery finishing techniques complement a Polished embroidered design on garments, and when should you apply hand finishing alongside machine embroidery?
Hand embroidery finishing techniques complement a Polished embroidered design on garments by refining edges and securing threads beyond machine capabilities. Use secure thread tails, precise trimming, appropriate layering underlays, and a gentle post-stabilization press to achieve a refined finish, especially on logos or delicate areas where machine work alone may fall short.
What considerations come into designing embroidered patches for apparel to achieve a Polished embroidered design on garments?
Designing embroidered patches for apparel can enhance a Polished embroidered design on garments by offering well-placed, cohesive elements. Consider patch size, backing type, edge finishing, and compatibility with the garment fabric to ensure patches integrate seamlessly and maintain the overall professional look.
How can you troubleshoot common issues such as puckering, thread breakage, or color bleed to maintain a Polished embroidered design on garments using professional embroidery tips?
To maintain a Polished embroidered design on garments, address common issues with professional embroidery tips: adjust stabilizers and stitch density, ensure the needle size matches thread weight, use high-quality, colorfast threads, and test on fabric swatches before final stitching. If puckering or color bleed occurs, re-evaluate fabric tension, stabilizer choice, and color planning to achieve a durable, crisp result.
| Topic | Key Points |
|---|---|
| Introduction | Defines the concept of a polished embroidered design on garments, emphasizing planning for fabric texture, stabilizers, and clean finishing to achieve durable, professional results. |
| Understanding basics | Key factors include fabric compatibility, stitch density, thread selection, and backing stability; designs should be scalable, legible, and well-supported by the garment. |
| Materials and stabilizers | Choose stabilizers based on fabric; cutaway for woven fabrics like cotton twill or denim; tear-away and underlays for knits; stabilizer should disappear visually; incorrect stiffness can cause puckering or blur. |
| Design prep | Digitize art for embroidery; plan stitch types, density, underlay, and pull compensation; map colors to fabric; test swatches and ensure legibility across sizes. |
| Tools and methods | Use a reliable machine with sharp needle, quality threads, proper tension, stable hooping; hand finishing enhances edges and tails for a refined look. |
| Stitch patterns and finishing techniques | Select appropriate stitch types (satin for outlines, fill for large areas); an underlay stabilizes the surface; test density on scrap; beware thread weight and color punch-through. |
| Fabric types and garment tips | Provide fabric-specific tips for cotton denim, knits, silks, leather; use appropriate stabilizers and adjust stitch density to protect the material. |
| Troubleshooting | Address puckering, thread breakage, color bleed, backing show-through with stabilization choices; ensure thread/needle compatibility; test before final application. |
| Finishing touches and quality checks | Trim tails neatly, use post-stabilization pressing, remove excess backing after washing if recommended, and perform a gentle wash test to verify durability. |
| Design patience and practice | Start with simple motifs to master hooping, stabilizers, and stitch balance; practice pieces help refine digitizing and finishing before applying to important garments. |
| Maintaining craft and trends | Stay informed through industry blogs and communities; test new stabilizers, software, and finishing techniques to keep skills aligned with best practices. |
Summary
Polished embroidered design on garments elevates everyday attire into wearable art by combining careful planning, fabric-aware technique, and precise finishing to create durable, professional results. The approach starts with selecting compatible stabilizers and planning stitch density, then progresses through digitizing, color planning, tool selection, and finishing to ensure longevity across fabrics. With practice on different textiles and attention to hooping, stabilizers, and edge finishing, you can achieve results that endure wear and washing while remaining visually striking. Embrace patient experimentation with colors and textures to tell a story of quality in every garment.